mail us  |  mail this page

contact us
training  | 
tech stuff  | 

products

support home
NetWidget
air-frame

resources

on-line help
tech info
faqs
open guides

If you are happy it's OK - but your browser is giving a less than optimal experience on our site. You could, at no charge, upgrade to a W3C STANDARDS COMPLIANT browser such as Mozilla

The Router Wizard

The Router Wizard takes you step by step through the process of setting up your Router. The Router Wizard provides the following features:

  • Configuration Templates are used to minimize questions.
  • Each screen asks for the minimum information required.
  • Consistent navigation allows back up to correct errors.
  • Additional Options may be configured using the 'Advanced' button.
  • The Wizard does not use Sub Net Masks, but automatically calculates them from IP Addresses.
  • HTML Help screens are provided for each step.
  • Check lists may be printed before starting configuration.
  • Graphics and Icons show the stage of information capture.

The following screens show the first 4 steps until you are asked to select the router template. Every screen contains a Help button, which will display information about that screen and lead you to additional information about the various topics required.

Router Wizard Startup Screen

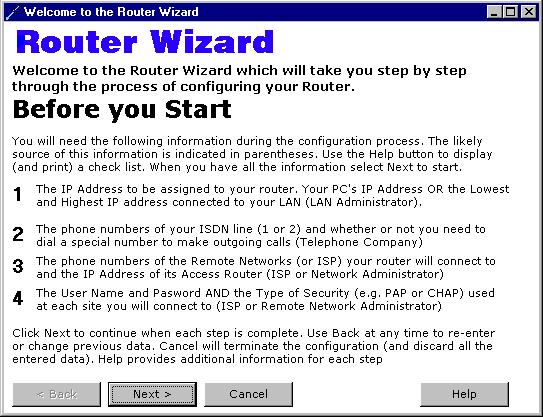
When the Router Wizard starts the following screen is displayed:

Router Wizard Step 0

NOTE: all Router Wizard screens have consistent navigation buttons as shown on the bottom of the screen above.

The initial Router Wizard screen provides a text description of the configuration process and a reminder of the information you require to complete the process of configuring your Router.

Router Wizard Step 1 (IP Address)

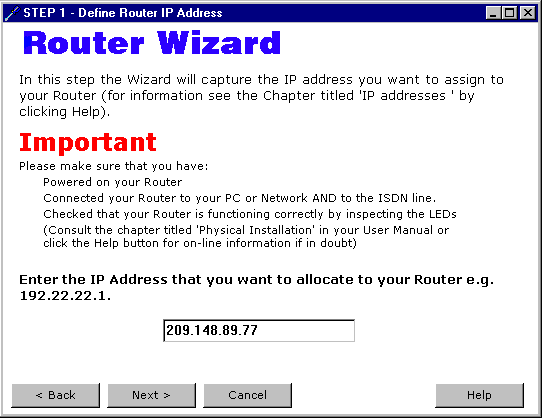
This screen allows you to define the IP address of the Router.

Router Wizard Step 1

Note: All Router Wizard screens have consistent navigation buttons as shown at the bottom of the screen above.

This screen requests the current IP address of the Router, or the IP address that you wish to allocate to the Router.

IMPORTANT: Before entering the IP address your Router should be fully functional and installed.

Router Wizard Step 2 (ISDN Line)

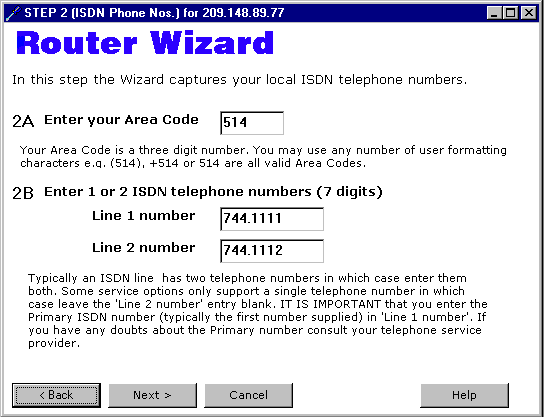
Router Wizard Step 2

Note: All Router Wizard screens have consistent navigation buttons as shown at the bottom of the screen above.

This screen requests you to enter the details about the area code and telephone numbers of your ISDN line configuration.

Enter your Area code

Enter your 3-digit area code and any formatting characters you require (e.g. ‘(514)’, ‘514’ and ‘-514-‘ are all valid).

Enter 1 or 2 ISDN Telephone Numbers (7 digits)

Enter the 7-digit local phone number and any formatting characters required (e.g. ‘744-1111’, ‘744.1111’ or ‘7441111’ are all valid). ISDN lines typically have two telephone numbers if you only have a single number allocated enter it in the 'Line 1 number' box and leave the 'Line 2 number' box empty.

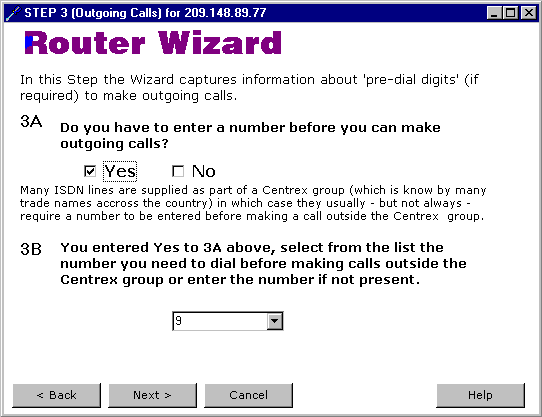
Router Wizard Step 3 (Pre-dial No.)

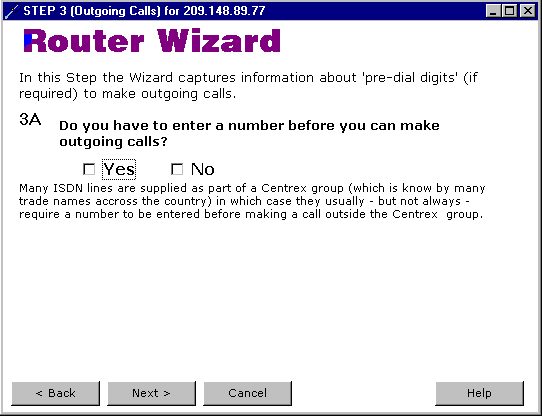
Note: All Router Wizard screens have consistent navigation buttons as shown at the bottom of the screen above.

Many ISDN lines require a number to be dialed (to get an outside line) before the outgoing number can be dialed. This number is sometimes called a 'pre dial digit or string'.

If your line does NOT require any numbers to be dialed check the NO box and then Next. If your line does require a number check the YES box, which will display question 3B.

NOTE: The term Centrex is widely used with ISDN (though it can be known by many trade names across the country e.g. Microlink in Canada). Most Centrex lines do require a 'pre dial digit'. If in doubt check with your Telephone Service Provider. Remember you can always add or remove the digit later.

Router Wizard Step 3 (continued)

Router Wizard Step 3A

If you check YES to question 3A then question 3B will be displayed. Enter or select from the combo box the number that has to be dialed to make an outgoing call. If the number is '9' this is already selected as the default. You need to do nothing but move to the next screen.

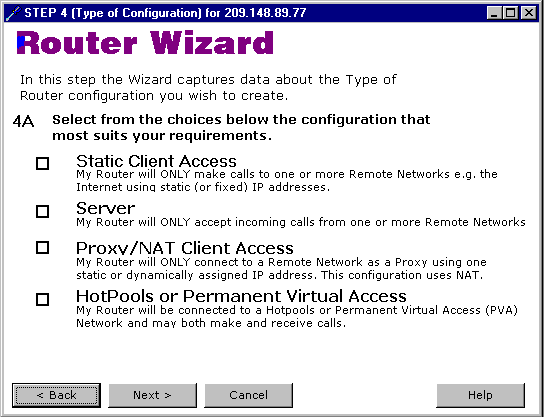
Router Wizard Step 4 (Template)

Step 4 requests you to select a Type of Router (a Configuration Template) and will tailor the questions asked in subsequent steps based on your selection.

Router Wizard Step 4

Note: All Router Wizard screens have consistent navigation buttons as shown at the bottom of the screen above.

Static Client Access

The Router will ONLY make outgoing calls to one or more remote network(s) (which may be the Internet or a company Intranet). If your Router must be able to receive calls don't check this box, instead select either the Server or HotPools (Permanent Virtual Access) boxes.

Server

The Router will ONLY receive calls from one or more remote networks and cannot make outgoing calls. If the Router must be able to make outgoing calls don't check this box, instead select the HotPools (Permanent Virtual Access) box.

Proxy/NAT Client Access

If your Router will use a single (Static or dynamic) IP address to support one or more LAN connected PCs and only make OUTGOING calls to the Internet or remote network.

HotPools or Permanent Virtual Access

Permanent Virtual Access (PVA) is a bi-directional network access technology pioneered by ZyTrax, which typically reduces Internet connection costs by up to 50% (for a full explanation go to http://www.zytrax.com/hotpools). If your company or Internet Service Provider supports PVA access technology check this box.

Contents List Contents List


Problems, comments, suggestions, corrections (including broken links) or something to add? Please take the time from a busy life to 'mail us' (at top of screen), the webmaster (below) or info-support at zytrax. You will have a warm inner glow for the rest of the day.

Copyright © 1994 - 2024 ZyTrax, Inc.
All rights reserved. Legal and Privacy
site by zytrax
hosted by javapipe.com
web-master at zytrax
Page modified: January 20 2022.