Chapter 5. Bind on Windows
FreeBSD Install (4.x and 5.x)
Linux Install (Fedora Core 2)
Windows Install - Windows 10/7
Windows Install NT 4.0
Windows Install Win 2000 Server
Windows 10/7 Installation
This section describes installation of BIND 9.7.2-P2 under Windows 10 and 7 Home Premium (64 bit) on a modestly powered laptop using the standard binary package - but applies to all later releases as well (Note: Installation updated to BIND 9.10.4-P1). It is presented here in the hope that it will encourage readers to explore BIND 9 on the nearly ubiquitous platform and especially since some of the changes in procedure illustrated reflect current Windows architectural changes (especially in the area of security practices) and therefore are likely to be more useful over time. The installation process was found to be fast and, relatively, simple.
Note: Many people - especially those who like to experiment - lose patience with the User Account Control (UAC) features of modern Windows platforms (Vista, Server 2008+, 7 and 10 - we will mercifully draw a veil over Windows 8) and turn it off completely. This is entirely a matter of choice and taste. The system used to illustrate the installation uses an unmodified Windows 10/7 UAC. There is no need to sacrifice UAC capabilities in order to install and use BIND 9.
A troglodyte's lament and apology: Windows 10/7 have many features to allow customization of displays and menus. Consequently some of the screens displayed may not look exactly like those on another system. Notes are supplied where there is a high likelihood this may be the case. The Windows 10/7 configuration perhaps reflects the author's attempts to make all Windows systems look as much as possible like a much-missed, frozen-in-time, Windows NT 4.0 system he used for many years before being, reluctantly, dragged into the current era.
Download the latest stable version of Bind from the ISC site ( www.isc.org/downloads - expand the BIND tab and select the lastest stable 32 or 64 bit version as you choose and unzip it into any suitable temporary location, for example, c:\temp\bind.
There is a file called readme1st.txt with the distribution that provides some useful information about the installation. In particular it mentions that BIND (or named.exe) will run as a service on Windows and will require a user account called named with specific permissions. The install process will create the required account and basic permissions.
In the temporary directory (c:\temp\bind), find and right-click BindInstall.exe, which will display the screen shown:
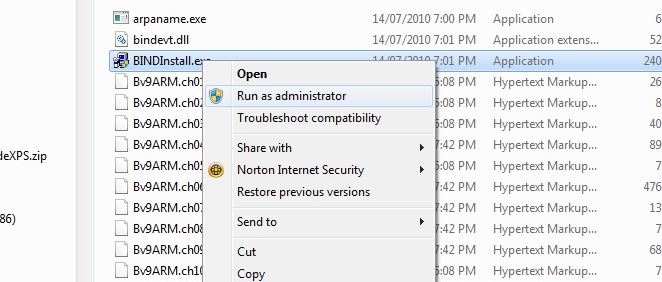
From the popup window select 'Run as administrator' to provide the right permissions required for the installation.
BIND 9 install will display the screen shown below:
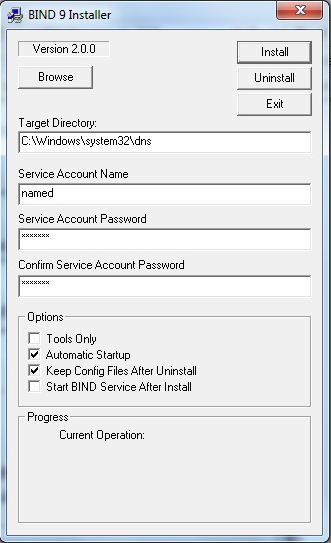
The password entry is mandatory with the default named account. The readme1st.txt file contains descriptions of other accounts that may not require a password if you wish to experiment. The test installation used the default Service Account Name as shown above. The default install directory is C:\Program Files\ISC BIND 9. Do not check the box labeled Start BIND Service after Install. The Tools Only box works as advertised - leave it unchecked for this install - unless, of course, you only want the tools and not the DNS server. Click the Install button.
Notes:
Since dinosaurs roamed the earth BIND on Windows was installed into %SYSTEM ROOT%\dns (typically C:\windows\sysWOW64\dns on 64 bit windows). At some point in BIND 9.10's evolution this changed to use C:\Program Files\ISC BIND 9 (C:\Program Files (x86)\ISC BIND 9 if a 32 bit BIND install is done on a Windows 64 bit platform). The notes below have been updated to relect this new location (existing installations which pre-date the change will still use C:\windows\sysWOW64\dns).
The install process creates a user account, if using AD then the created password has to be compatible with any defined AD password policy for account creation.
Use Windows Explorer to navigate to the directory called C:\Program Files\ISC BIND 9\etc (C:\Program Files(x86)\ISC BIND 9\etc if using a 32 bit BIND install on a 64 bit windows platform). Place or create the master.localhost, localhost.rev, named.conf and root.servers files in the C:\Program Files\ISC BIND 9\etc subdirectory. (If the 32 bit version of BIND was installed on a Windows 64 bit platform the paths should be modified to be C:\Program Files (x86)\ISC BIND 9\etc.) The named.conf file is a standard resolver (Caching-only DNS Server) modified to reflect the Windows path values in the installation and shown below. BIND will accept either Windows or Unix line termination conventions.
// generated by ME
// CACHING NAME SERVER for WINDOWS
//  Oct 2016
//  a. changed directory statement to windows format
//  b. changed location of log file to named\log\named.log
//   c. changed location of all zone files to named\zones
//   d. added pid-file directive in named\run\named.pid
options {
  directory "C:\Program Files\ISC BIND 9\etc";
  // version added for security, otherwise may be able
  // to exploit known weaknesses
  version "not currently available";
  pid-file "named.pid";
  recursion yes;
  // the following statement closed the server but limits
  // limits queries to the location PC only
  // alternatively use allow-recursion {192.188.2/24;}; (change IP as required)
  // or allow-recursion {"localnets"}; if your netmask is appropriate
  listen-on {127.0.0.1;};
};

// log to named.log events from info UP in severity (no debug)
// defaults to use 3 files in rotation
// failure messages up to this point are in the event log
  logging{
  channel my_log{
    file "named.log" versions 3 size 250k;
    severity info;
  };
  category default{
    my_log;
  };
};
zone "." {
  type hint;
  file "root.servers";
};

zone "localhost" in{
  type master;
  file "master.localhost";
  allow-update{none;};
};
zone "0.0.127.in-addr.arpa" in{
  type master;
  file "localhost.rev";
  allow-update{none;};
};
Windows 10/7 uses the NTFS filesystem and assuming the PID and log files are written to the installed directories no further permissions need to be set. Writing PID and log files into the /etc subdirectory may offend the aesthetic values of certain readers but has the merit of requiring the minimal work - always an important consideration. If the reader is still offended by this gross breach of normal *nix practice then appropriately named subdirectories can be created - but permissions will need to be added to allow the named account to write to these locations. The broad principle of setting permissions is shown in the next section.
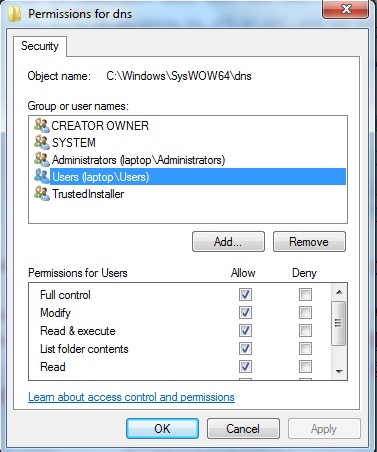
If the UAC system denies you access to the Windows, Program Files (Program Files (x86)), sysWOW64 or other required directories for adding or modifying files then you will need to change permission. One method of doing this is illustrated. Select the required directory (directory, right-click, and from the pop-up menu click Properties. This will display a tabbed window from which the Security tab should be selected. Select the Users account (secondary description will reflect the name of the users PC) and confirm that Full Control (or Write as a minimum) is enabled as shown:
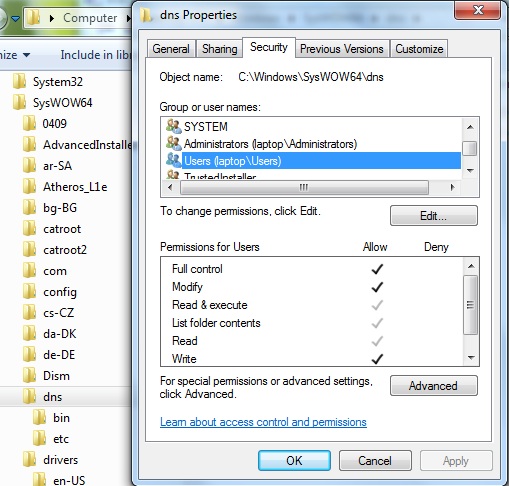
If the required permissions are not available click the Edit button, again select the Users account and then add the required permissions (see below). Finally, click OK. Windows will prompt with a warning along the lines that the sun will fall out of the sky if you continue, but in spite of that just click OK:
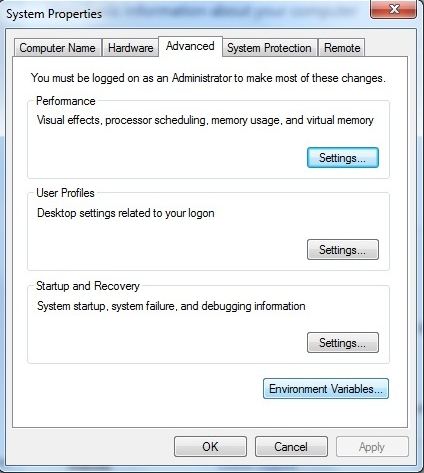
BIND installs software to a nonstandard location. To use diagnostic tools such as dig and other command-line tools, the full path will be required (good fun if you enjoy typing) or the Windows path environment variable can be changed to include the BIND installation directory. You can then forget where the BIND tools are installed! The path variable can be set using the following procedure. Select Start-> Control Panel ->System ->Advanced System Settings. In the resulting window select the advanced tab and click Environmental Variables (see below). If you enjoy typing long paths at the command prompt you can ignore this item.
On the resulting screen select the path variable in the lower widow and click Edit. At the end of the line add the following ;C:\Program Files\ISC BIND 9\bin (or ;C:\Program Files (x86)\ISC BIND 9\bin for 32-bit BIND install on a Windows 64 bit platform) and click OK. (In Windows 10 the path is displayed more conveniently as a series of line items. Clicking the New Button (on the right of the window) will generate an empty new line to accomodate the above path.) See below:
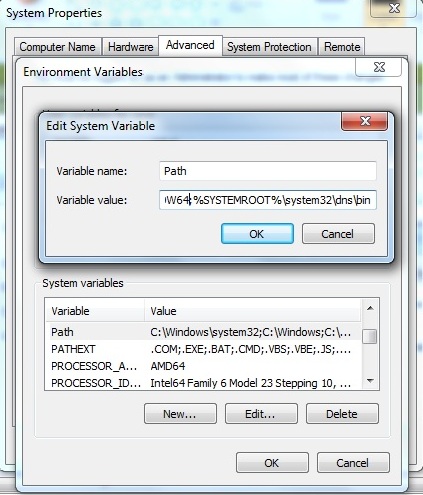
Note: The path separator on Windows is a semicolon, not a colon, as in the Unix world. Setting the path has the effect of automatically locating, say, dig or nsupdate. However, there is a Windows version of nslookup that will be found first. Using the BIND version of nslookup either requires a full path command, such as C:\Program Files\ISC BIND 9\bin\nslookup.exe (or C:\Program Files (x86)\ISC BIND 9\bin\nslookup.exe for a 32-bit BIND install on a Windows 64 bit platform) when running it from the command line. Alternatively, the preceding path directive can be placed first in the path list, which, in turn, has the disadvantage that it will add an extra check for all other program loading operations that use normal Windows locations.
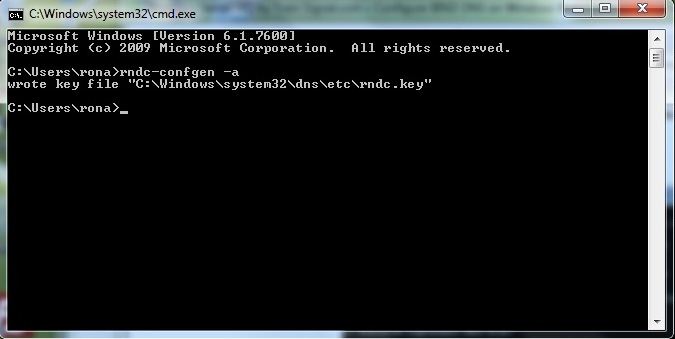
As both a test of the success of the path change operation and in order to add the required rndc key file prior to staring bind run rndc-confgen from a command prompt. Click the Start icon and then click the Run button (if the run button is not present it may be added by right-clicking the Start icon, selecting Properties and then Customize from the Start Menu tab - all kinds of interesting goodies are also available using this procedure). At the run prompt type cmd and OK. At the resulting command prompt (aka DOS Box) enter rndc-confgen -a to write the rndc.key file as shown below:
Now the installation is ready to replace the normal Windows 10/7 DNS Client with the BIND 9 version. Click the Start icon, click Administrative Tools (or Start ->Control Panel ->Administrative Tools) and select Services. At the resulting screen find and right-click the DNS Client entry, then click Properties. The screen shown below will be displayed:
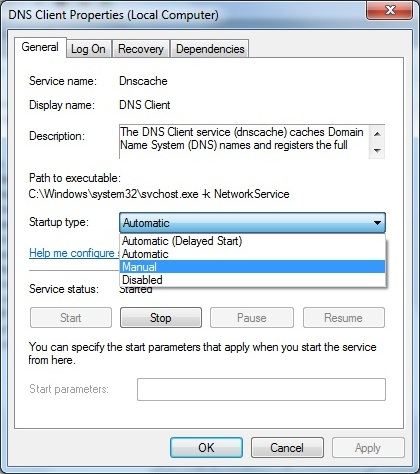
Select Manual (or Disabled) from the drop down box, then click the Stop button. Finally, click OK to close the window. At this point the PC has no DNS service and any applications that depend on it will fail temporarily until we start the BIND 9 replacement service.
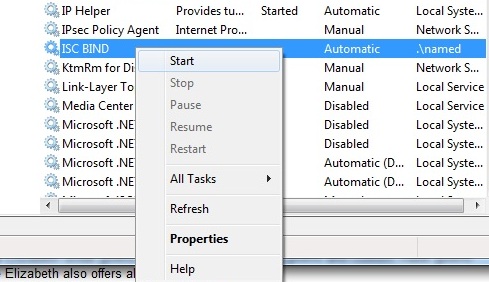
Find and select the service named ISC BIND, right-click and click the Start menu item as shown below:
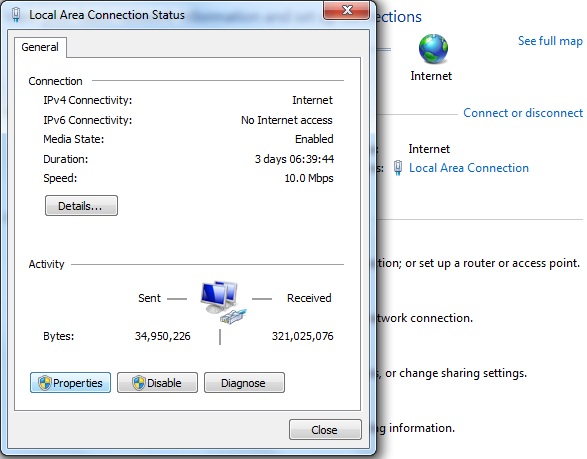
Finally, the PC may need to be configured to use the local DNS service other than one which may have been allocated by DHCP or a similar service. Click the Start icon -> Control Panel -> Network and Sharing Center, then from the resulting window select Local Area Network and click Properties. See Figure below:
From the properties screen select Internet Protocol Version 4 (TCP/IPv4) then click Properties. See below:
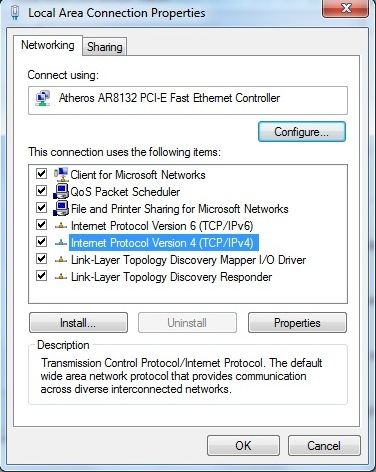
In the TCP/IPv4 Properties window click the radio button 'Use the following DNS server addresses', then enter the IPv4 address of the PC or more simply, as shown, its loopback or local address 127.0.0.1 (see below). Click OK to dismiss all previous windows and we are now fully operational using a BIND 9 caching resolver (assuming use of the named.conf file shown previously - though any configuration can be used depending on local needs).
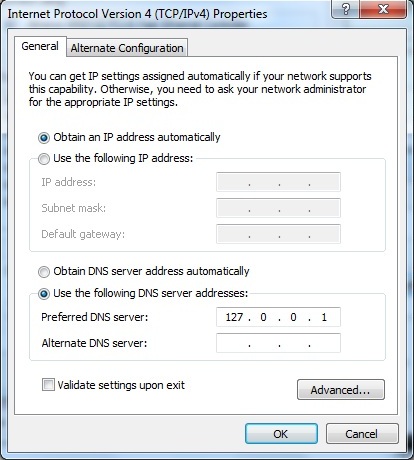
To fully test the server, it is necessary to reboot. When the server has rebooted, use Event Viewer to check the Applications log for failure messages, and then use Task Manager to check that the ISC BIND service started up (it loads as named.exe).
Installing BIND on Windows is a simple task requiring some modest user intervention. The entire process takes less than 10 minutes. If you need or want consistency of DNS for maintenance and other purposes across mixed Windows, Unix, Linux, or BSD environments, using BIND is the only solution. As a happy side benefit, you also get dig, nsupdate, rndc, nsupdate and other tools, meaning that you can diagnose, update, and control BIND installations on other OS platforms from a Windows desktop, laptop or server.
WinNT 4.0 and Win2k Installation
<Obsolete Historical Information> Left in to remind us what the world used to look like when we were young and innocent (well perhaps not that innocent...).
We decided that it was time to try out BIND 9 on our aging NT 4.0 desktops and a Win2000 server that we keep around for some light relief. We primarily wanted to use dig consistently across all our systems so that we could forget nslookup and this seemed like the ideal way to do it as well as provide some local DNS cache services on all our remaining NT 4.0 desktops. We had a couple of problems mostly due to BIND's normal paucity of documentation. Still, it's good to see that some things in life don't change.
Note:
As of BIND 9.3.2 NT 4.0 is no longer supported by ISC BIND releases. That's the bad news, the good news is Windows XP and Server 2003 are now supported. So you can read about NT 4.0 installation just like you would a history book - stuff that happened in the past or skip to Windows 2000 install or Windows 7 install if you subscribe to the theory that 'history is bunk'.
New Windows installers now offer a 'tools only' installation option. However, if you want to put the tools on a USB stick it may be quicker to just download the installer, unzip and copy whatever tools you require, such as dig.exe, and the following addition files: libbind9.dll, libdns.dll, libisc.dll, libisccfg.dll and liblwres.dll onto your USB stick thingy. With the USB thingy clutched in your hot sticky fingers you are good to go.
Install on NT 4.0
If anyone remembers NT 4.0, this may be of historical interest, Alternatively, to others it may bring back memories of when the world, and they, were young and innocent. Did we really say that?
We took a low risk approach to set up a simple caching DNS server and defaulted everything. This was what we did:
We down-loaded Bind 9.3.0.zip from the ISC site and unzipped it into a temporary location. So far so good.
We found the readme1st.txt file in the temporary install directory and took the 15 seconds required to read this copious document. The most interesting thing at this point is that Bind9 is going to run as an NT service and that it appears it will require a unique NT account, passwords and special permissions. Very unwindows like.
From here on out we are logged in as a local administrator on the NT 4.0 PC.
We added a new user account called named (the default assumed by the BIND install) using Start->programs->administrative tools->user manager. Entered passwords and set user can't change password and password never expires options. Otherwise it's a normal account so far - but it requires NT service logon capabilities. So we have a little more work to do. We subsequently installed BIND 9 on Windows 2000 and discovered the install process will create the required named account automatically so you can bypass this step.
In User Manager select User Rights from Policies menu, check the Show Advanced User Rights and then find and select the log on as a service right and click the Add button.
Select the local PC if you are working in a domain and because, by default, it only shows the groups click Show Users then select the named account and click the Add button on this window to assign the log on as a service to the named account. We did not remove any rights so we suspected the BIND install would object during the install because the readme1st.txt file suggests that if there any more permissions than the one required (log on as a service) it will send you a little message. If you are allergic to messages and have a couple of minutes to spare you can remove the excess rights. We didn't - we love chatty messages and were quite looking forward to it! Kill all the User Manager windows and we're done with this phase. Again as we subsequently discovered the install process automatically creates the relevant account with the correct permissions.
Back to our temporary directory and double click the BindInstall.exe and up pops this screen:
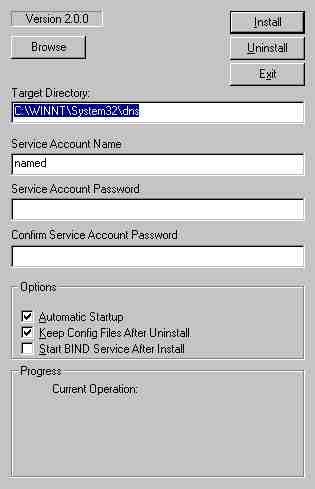
We just added the password for the named account and noted in passing that the default install directory is c:\Winnt\system32\dns (or %SystemRoot%\system32\dns in windows terms) and clicked the Install button. The install appeared to run like a dream. And yes, we got our little message about too many permissions. It was the highlight of the install. Note: We did not check the box labelled Start BIND Service after Install, we have some more stuff to do before run the service.
We set up a directory called c:\Winnnt\system32\dns\etc\named and then created three sub-directories called run, zones and log. You can do this anywhere but we were a little suspicious of Bind9's ability to figure out Windows paths so we did it this way.
We placed our master.localhost, localhost.rev and root.servers files in the zones sub-directory and the named.conf file below into the %SystemRoot%\system32\dns\etc directory.
// generated by ME
// CACHING NAME SERVER for NT 4.0
// 1. dec 2004
//	a. changed directory statement to windows format
//	b. changed location of log file to named\log\named.log
// 	c. changed location of all zone files to named\zones
// 	d. added pid-file directive in named\run\named.pid
options {
	directory "C:\Winnt\system32\dns\etc";
	// version added for security otherwise may be able to exploit known weaknesses
	version "not currently available";
	pid-file "named\run\named.pid";
	recursion yes;
};

// log to named\log\named.log events from info UP in severity (no debug)
// defaults to use 3 files in rotation
// failure messages up to this point are in the event log
	logging{
	channel my_log{
		file "named\log\named.log" versions 3 size 250k;
		severity info;
	};
	category default{
		my_log;
	};
};
zone "." {
	type hint;
	file "named\zones\root.servers";
};

zone "localhost" in{
	type master;
	file "named\zones\master.localhost";
	allow-update{none;};
};
zone "0.0.127.in-addr.arpa" in{
	type master;
	file "named\zones\localhost.rev";
	allow-update{none;};
};
We used windows explorer to give the account named full control over the directory c:\Winnt\system32\dns with the inherit property set so all lower directories pick up the same permissions. The install process does not set permissions - as we subsequently discovered on Windows 2000 - so this step is essential.
We are lazy and forgetful so decided to add the BIND9 bin directory (%SystemRoot%\system32\dns\bin) to the Windows path since we are going to use dig for sure on a regular basis and in a couple of days we will have forgotten where is it - scrub that idea - in a couple of hours we will have forgotten where it is. So Start->settings->control panel->system and check the environment tab. Find and click the Path and Add the following (or wherever your BIND9 bin directory is).
;%SystemRoot%\system32\dns\bin
Click Set and exit. Note: the separator on windows is a semi-colon not a colon as in the *nix world. Cost us 10 minutes with a magnifying glass to fix that one.
Time to start the service. Start->settings->control panel->services. Select ISC BIND and try and start it. It failed for us with a login error. So we re-entered the password (using User Manager) and tried again and it worked. The standard install is set for automatic start so we re-booted the PC and checked that named.exe was started with Task Manager. It was.
Finally we opened a dos box and tried a dig command. Seemed to run a bit slowly but we got our results. And yes we had already forgotten where we installed bind. Thank goodness we set the path variable.
We have not used the service frequently but we were pleasantly surprised at how easy it was to install. Task Manager shows about 380K of memory usage which is by no means excessive. If you want consistently of DNS across a mixed Windows and *nix environment using BIND is the only way to do it.

Win2k Installation
This section describes installation of BIND 9.3.0 on Windows 2000 server.
Having setup BIND on NT 4.0 we decided to install BIND on a server - again as a simple caching server. This was what we did:
We down-loaded Bind 9.3.0.zip from the ISC site and unzipped it into a temporary location. So far so good.
We found the readme1st.txt file in the temporary install directory and took the 15 seconds required to read this copious document. The most interesting thing at this point is that Bind9 is going to run as an NT service and that it appears it will require a unique NT account, passwords and special permissions. The install process creates the required account but we manually set the account up under NT 4.0 entirely due to a misplaced mistrust in BIND's install process and because the documentation did not tell us it would do so.
In our temporary directory we double clicked BindInstall.exe and up pops this screen:

The password entry is optional - you can leave it blank or not as you choose - we left it blank (but see NT 4.0). We noted in passing that the default install directory is c:\Winnt\system32\dns (or %SystemRoot%\system32\dns in windows terms) and clicked the Install button. The install appeared to run like a dream. We did not check the box labelled Start BIND Service after Install, we have some more stuff to do before run the service.
We set up a directory called c:\Winnnt\system32\dns\etc\named and then created three sub-directories called run, zones and log. You can do this anywhere but we were a little suspicious of Bind9's ability to figure out Windows paths so we did it this way.
We placed our master.localhost, localhost.rev and root.servers files in the zones sub-directory and the named.conf file below into the %SystemRoot%\system32\dns\etc directory.
// generated by ME
// CACHING NAME SERVER for NT 4.0
// 1. dec 2004
//	a. changed directory statement to windows format
//	b. changed location of log file to named\log\named.log
// 	c. changed location of all zone files to named\zones
// 	d. added pid-file directive in named\run\named.pid
options {
	directory "C:\Winnt\system32\dns\etc";
	// version added for security otherwise may be able to exploit known weaknesses
	version "not currently available";
	pid-file "named\run\named.pid";
	recursion yes;
};

// log to named\log\named.log events from info UP in severity (no debug)
// defaults to use 3 files in rotation
// failure messages up to this point are in the event log
	logging{
	channel my_log{
		file "named\log\named.log" versions 3 size 250k;
		severity info;
	};
	category default{
		my_log;
	};
};
zone "." {
	type hint;
	file "named\zones\root.servers";
};

zone "localhost" in{
	type master;
	file "named\zones\master.localhost";
	allow-update{none;};
};
zone "0.0.127.in-addr.arpa" in{
	type master;
	file "named\zones\localhost.rev";
	allow-update{none;};
};
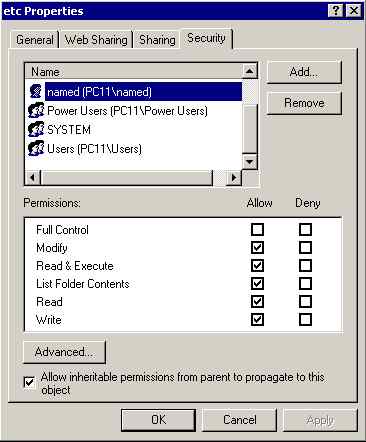
We used windows explorer to give the account named everything except full control over the directory c:\Winnt\system32\dns with the inherit property set so all lower directories pick up the same permissions. This is essential to avoid permission errors when you start the BIND service.
Select the BIND install directory (this shows the default in c:\%SystemRoot%\system32\dns)in Windows Explorer:
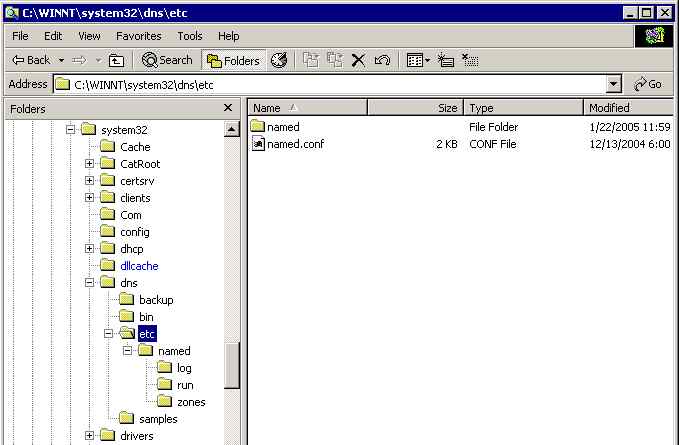
Right click properties then permissions and find and select the named account and Add:
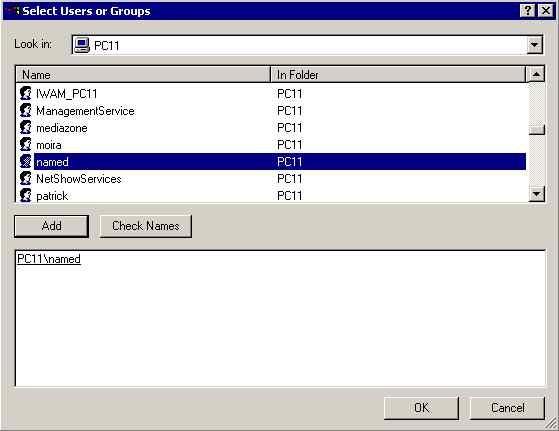
Add all permissions except full control and leave the inherit check box set (the default):
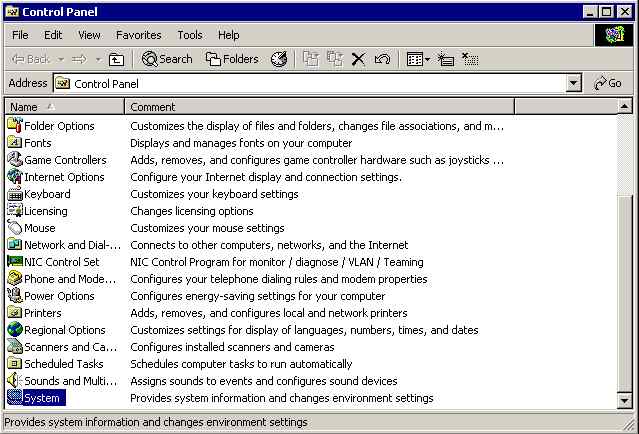
We are lazy and forgetful so decided to add the BIND9 bin directory (%SystemRoot%\system32\dns\bin) to the Windows path since we are going to use dig for sure on a regular basis and in a couple of days we will have forgotten where is it - scrub that idea - in a couple of hours we will have forgotten where it is. So Start->settings->control panel->system:
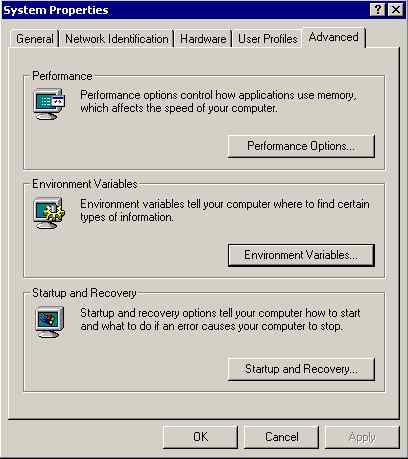
Click Environment Variables from the Advanced tab:
Find and double click the path line and Add the following (or wherever your BIND9 bin directory is located):
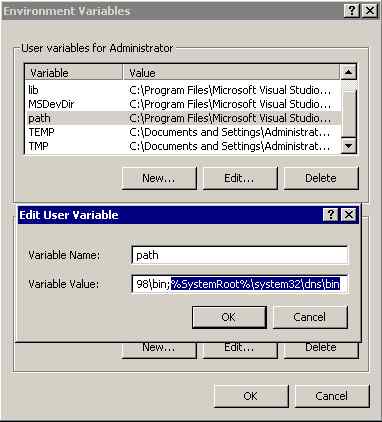
Click OK and exit. Note: the separator on windows is a semi-colon not a colon as in the *nix world. Cost us 10 minutes with a magnifying glass to fix that one.
Time to start the BIND service. This is a Server so the standard Windows DNS services is activated by default. First we have to disable it using Computer Management; expand Services and Applications then double click Services and find DNS Server:
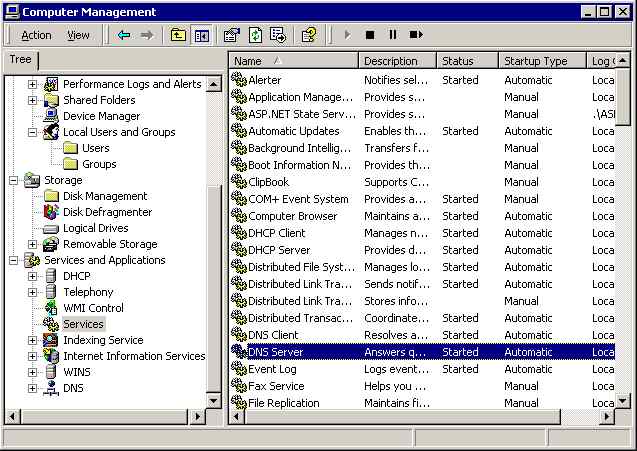
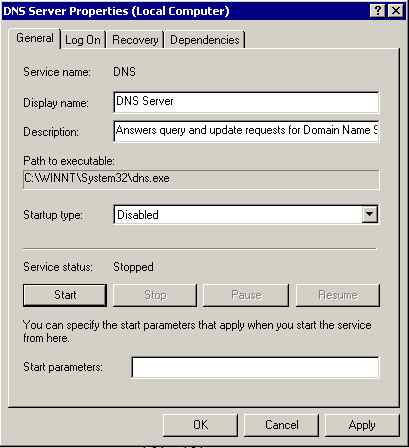
Double click DNS Server and disable the service then click Stop then OK:
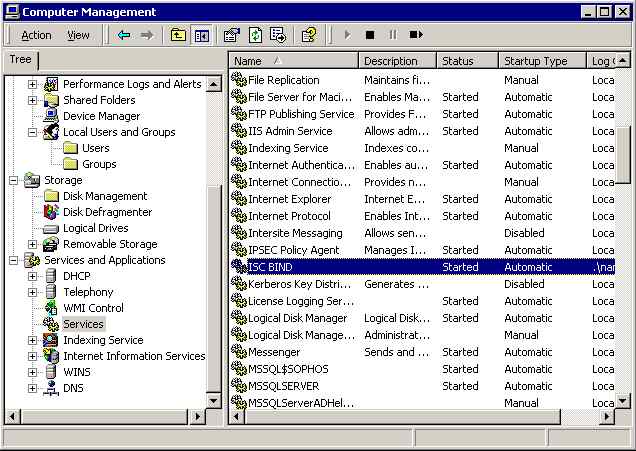
Find and double click ISC BIND:
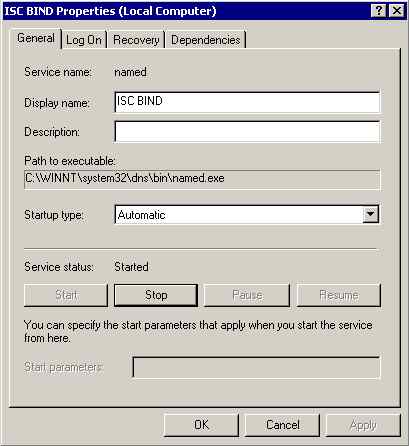
Double click ISC BIND and click Start (the service is set to Automatic by default which means it will load on start-up:
Any errors will be logged under Applications in the Event Log.
Finally we opened a DOS box (Start->run->cmd) and tried a dig command:
dig @192.168.2.2 example.com any
Seemed to run a bit slowly but we got our results. And yes, we had already forgotten where we installed bind. Thank goodness we set the path variable.
Note: The @192.168.2.2 is required to force use of the local service irrespective of the TCP configuration.
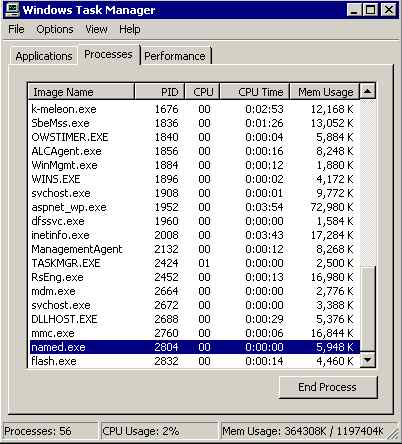
We changed the DNS settings to use the local DNS service (Start->Control Panel->Network and dial-up Connections->select Local LAN->Properties->find and double click Internet TCP/IP) and re-booted the PC. We used Task Manager to check that the ISC BIND service started-up (is loads as named.exe):
We were pleasantly surprised at how easy it was to install. If you want consistently of DNS for maintenance and other purposes across a mixed Windows and *nix environment using BIND is the only way to do it. As serious side benefit you get dig and other tools as a bonus.

Problems, comments, suggestions, corrections (including broken links) or something to add? Please take the time from a busy life to 'mail us' (at top of screen), the webmaster (below) or info-support at zytrax. You will have a warm inner glow for the rest of the day.


